Showing posts with label CSS. Show all posts

Tuesday, December 3, 2013

little elves

I've already shared with you my handmade elf on the shelf, created with Clear and Simple Stamps dies.  In the 3 days he's been here, our elf has already stolen the kids' advent candy, rolled down the stairs in a toilet paper roll, and bathed in a tub of mini-marshmallows.  Thank you, Pinterest, for making this stress-free and so fun for the kidlets.

Today, I'm back to share a few stamped elf-y projects.

little elves


I can't wait to watch "Elf" with the kids - that quote from the movie is the best, isn't it?

little elves

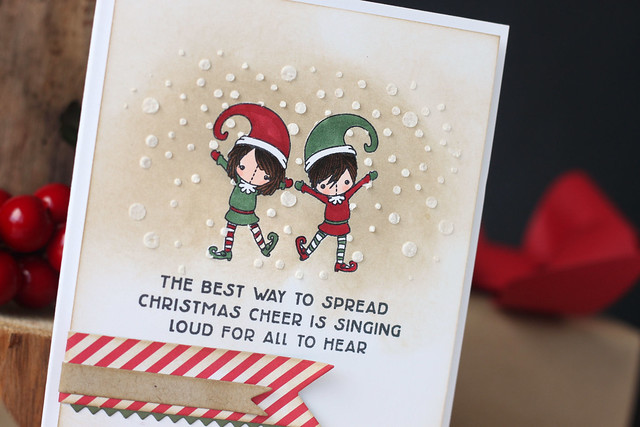
The how-to for this card involves stamping and masking the elves, sponging a soft brown shadow around them and (with the masks still in place), using a snowfall stencil and some embossing paste to make it look like they are caught in a mini-blizzard.

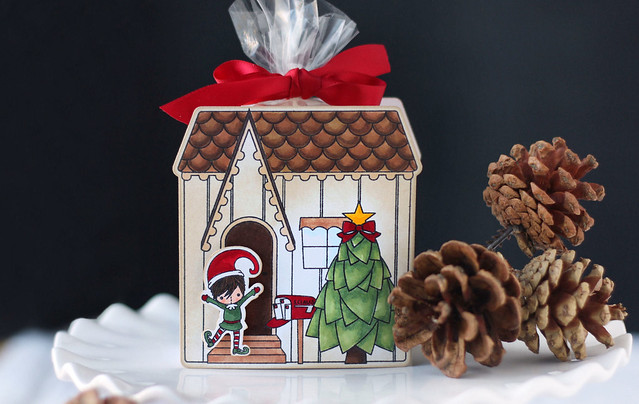
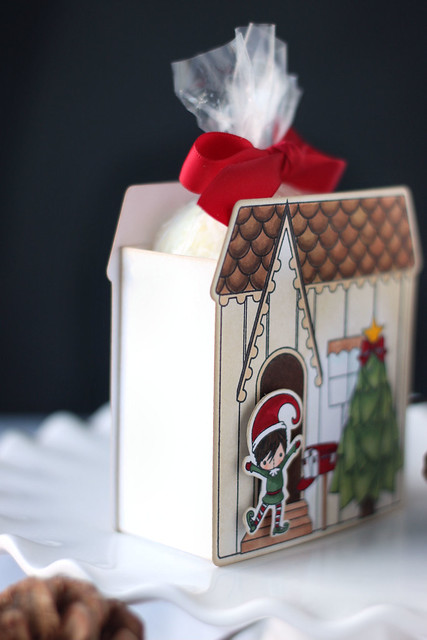
I also used the set to create a holiday treat box:

little elves

Slip a few cookies or chocolates into a box like this, with an optional gift card tucked in as well, for the teachers this year.  That's my game plan!

little elves

I kept the coloring very simple.  In addition, the main planks of the house image weren't colored at all, but sponged with ink.  Consider that your time and marker-saving  tip of the day.  The only thing that could have made this project better would have been a die for that elf. coughahemcough.

To create the box, I die-cut two house-shapes and then whipped up a simple box for the middle.

little elves


♥.

Tuesday, November 12, 2013

diy elf on the shelf

I am so excited to share this post with you! Actually, I was so excited to share the idea with Nicki (from Clear and Simple Stamps) and it just so happens that they've released a rag doll elf stamp set, so I'm thrilled to be able to partner with CSS one more time.

diy elf on the shelf

When I first received the rag doll dies, I immediately thought beyond plush dolls, all the way to Christmas crafting.  I wanted to make my very own elf-on-the-shelf.  Because let's face it, the *official* one is a bit creepy.  My version is cuddly and soft and oh-so-cute.

diy elf on the shelf


My friend Deb and I (of Sprouting Jube Jube fame) crafted our matching dolls together.  I highly recommend crafting with friends.  The giggling and squealing over every bit of the dolls made it so worth the night out.

Using the dies, I made some alterations to the shape of the rag doll.  Firstly, the doll's arms and legs are extra long.  To do this, I ran the dies through the machine up to a point and then continued cutting them by hand to the desired length.

diy elf on the shelf


The doll's pointy ears were free-handed - aren't they so cute? And the hat and scarf were re-purposed from a pair of men's socks.  You could see a bit of the heel of the sock, where I gathered it to attach my handmade pom-pom.

diy elf on the shelf


Deb did an amazing job of whipping up a pair of overalls for each of our dolls:

diy elf on the shelf


When the kids get their elf for the first time, at the beginning of December, they will receive a note, complete with Santa's seal of approval...

diy elf on the shelf

...and an introduction from the big man himself:

diy elf on the shelf


I hope you liked my handmade elf!  I can't wait to see what mischief he gets into in December!

♥.

Tuesday, September 17, 2013

rsvp to the mummy.

Have you checked out the September/October digital issue of paper crafts magazine?

I have a fun halloween invitation published there, on page 45:

rsvp to the mummy.

Admittedly, the picture of the card in the magazine is much less boring.  I die-cut an owl, and a vellum ghostly overlay (all dies are by Clear and Simple Stamps.)  A simple stitch-line at the top secured the pieces together.

My favorite part is the text on the owl belly:

rsvp to the mummy.

rsvp to the mummy.  still my fave.

I hope you like it!  I have a few halloween rejects to show you over the next few days - cards that didn't fit what Paper Crafts was looking for, but that I still really love!

♥.

Friday, September 6, 2013

happy halloweenie.

Are you ready another halloween card?  But honestly, I would share this one anytime of year, just because it's good for a laugh.

happy halloweenie.


Look at the cute wiener, shaking his groove thang!  I saw *this card* on ETSY, and immediately giggled my way through making my own, handstamped version.

Who knew turning a hot-dog image upright and adding some doodly arms and legs could be so fun?

happy halloweenie.

This card is sitting on my craft desk, and will probably stay there for awhile.  And yes, I tend to laugh at my own jokes before giving anyone else the chance.

I just giggled, by the way.

☻.


Supply list
stamps: foodie fun, curly label frames 1 (both CSS), sharp backdrops (lawn fawn)
font: traveling typewriter

Tuesday, July 30, 2013

tooth fairy business.

tooth fairy business

A friend asked if I would make something for her daughter, who was on the verge of losing her first tooth.  I created a door hanger (don't you love the shiny gold knob? ha) with a little place for the tooth fairy to come in and arrange the exchange of tooth for coin.

I love the idea of hanging the tooth on the door, don't you?  Instead of trying not to wake the child by fumbling under their pillow in the dead of night...

I used this wine bottle hanger die to create my door hanger.  A slit at the top equals instant transformation.

tooth fairy business

I cut the tooth shape using my silhouette, and two vellum hearts made perfect glittery wings.

tooth fairy business


Inside, a tiny envelope.  perfect drop site.

tooth fairy business


I hope you like it!

Tuesday, July 23, 2013

nice buns, hun!

I gave this to my hubby, just for fun:

nice buns, hun.

hee hee.

nice buns, hun.


I colored a trio of cinnamon buns, from CSS' "foodie fun" set and spelled out the word buns with "alpha duo" letters.

nice buns, hun.

I hand-wrote the word "nice" - not the best, but I'm gonna work on that.  I just need to figure out how to get my hand to stop shaking when I go to write on the "real" card.  It was much better on the scrap paper I practiced on.

But enough about the punny card, this was the fun part:
nice buns, hun.

mini cinnamon buns, in our party favor 11 box.  Aren't they adorable?  My sister made them for our Star Wars party (what's a SW's party without princess Leia's buns?) and I begged her for the recipe.  They are not gooey and sticky, but more biscuit-y with a sweet filling.  YUM.  I made them mini-sized to fit into the box, and they are delicious any way you decide to bake them.

Here's the recipe for BISCUIT CINNAMON ROLLS:

Ingredients
2 cups flour
2 tbsp sugar
3 tsp baking powder
1 tsp salt
1/3 cup oil
1/2 cup milk (may need more)
2 tbsp melted butter
1/4 cup brown sugar
2 tsp cinnamon

Directions
Mix all dry ingredients together in a food processor or mixer.  Add the oil and mix only until it becomes a course meal.

Gradually add the milk and mix until just combined.  Add more milk as needed to make a dough that can be rolled out easily.

Roll out the dough into a long rectangle shape.

In a bowl, mix the melted butter, brown sugar and cinnamon together.  Spread the mixture over the dough.

Roll the dough into a log and slice.  Bake at 450 for about 10 minutes, but a lot less if you decide to make baby buns like the ones pictured above.

Enjoy!

nice buns, hun.

Sunday, July 21, 2013

prepare to be pampered {spa party invitations}

I am so excited to share Sofia's spa party with you all... finally!  We hosted it a few months ago, and I have been sitting on a pile of pictures ever since.

prepare to be pampered.

I'm sharing spa-aaaah party invites today, cut with CSS's eye mask die.

prepare to be pampered.

I used images from our spa set to stamp the "spa-aaaah" banner and the sentiment underneath it.

A simple dot image, stamped multiple times before re-inking, gave me a subtle background without overwhelming the mask.

prepare to be pampered.

With a black copic multiliner, I drew in sleepy eyes, and glittered the lids.  I drew myself a template first, to make sure my eyes were lined up.

All of the party information was printed and cut on a separate eye-mask, and adhered to the back of this layer.

prepare to be pampered.

The party girl.

I hope you'll come back tomorrow for the full party!

Saturday, July 20, 2013

double congrats {CSS RIR)

double congrats.

Twins are double the fun, right?  I'm excited to show you twin rag dolls and a matching card, for today's RIR post.

double congrats.


I enlisted the help of a professional to show these dolls.  Deb, from "sprouting jube jube" is a good friend and an amazing seamstress.  I showed her the dolls that I sewed using our CSS dies (click here and here), and she jumped in and made a set of her own... with upgrades :)

double congrats.

She gave the boy doll a cute little faux fly - I love all that stitching on the jean - and she created a flouncy dress for the girl. me loves.

double congrats.

I love the pigtails with the ribbon in them!

double congrats.

For my card, I turned to those doodly frames again, but this time turned them upside down.

double congrats.


I masked the outside of the frames so that I could stamp their faces with only the eyes showing.  I then sponged ink inside the frames - blue for the boy, pink for the girl.  I like my clichés, what can I say...

double congrats.

To match the whimsical frames, I drew my own numbers, 1 & 2, at the top of each.  I used my favorite CSS alpha set to spell out the "congrats" greeting.

I hope you like what Deb and I have created for today's post!  More creative clicks here and here.

Thursday, July 18, 2013

we go together like {CSS}

we go together like...

I'm still crushing on these doodle-y frames...

we go together like...

They pair nicely with images from foodie fun, don't they?

we go together like...

I hope you like them!  More to see on Jean Martin's blog and over at CSS.

Have a great day!

we go together like...

Monday, July 15, 2013

you're not ready for this jelly.

aaaand now I'm singing old school Destiny's Child.

and now, so are you :)

you're not ready for this jelly.

It's Clear and Simple Stamps RIR week - that's release in review if you are just tuning in.  We're showing off sets and dies that were released last month to hopefully give you even more inspiration...

Why just gift a plain couple of jam jars when you can dress them up a bit?

you're not ready for this jelly.

Like i said, you're not ready.  But I'm a gift them to you anyways.... hee.

you're not ready for this jelly.

DIY background stamping...

you're not ready for this jelly.


and a couple of jars of homemade jelly.

More to see on the CSS blog!

♥.


Thursday, July 11, 2013

for the baker.... a stationery set.


for the baker...

It's group post time over at CSS!  We're showing off stationery sets - one of my very favorite things to craft.... and this one's for your favorite baker friend:

for the baker...

I created a set of cards, kitchen-themed tags, stickers and flags.

for the baker...

I used "let's bake: sentiments" to create my gift - I love that set so much!  The paper-pieced apron got a touch more frilly with an even bigger bow.  I kept it clean and simple, with just a binding of white washi tape for embellishment.

for the baker...

The stickers say "freshly baked" and match the colors of the patterned paper used on the apron and the twine seal.

for the baker...

When I saw this image in the set, I immediately thought of how fun it would be to make tags out of them, and be able to write the recipient's name across the banner, or identify the yummy gift contents...  but the image is too big to fit into any tag shapes that I already have.  I came up with a solution:

for the baker...


I ran the die through my machine like so, only cutting the tag "top" and leaving the rest to dangle outside of the cutting mats.

for the baker...

See?  the bubble top cut, and the rest was trimmed and corner-rounded by hand.

That's all from me, but here are some more paperie clicks for you to enjoy:

Audrey Jen ♥ Kim ♥ Lori Tracy CSS blog