Showing posts with label designer lines. Show all posts

Tuesday, April 16, 2013

monogrammed mini-cards {CSS group project}

***this is my second post of the day.  Scroll down or click *here* for my lawn fawn inspiration week post.


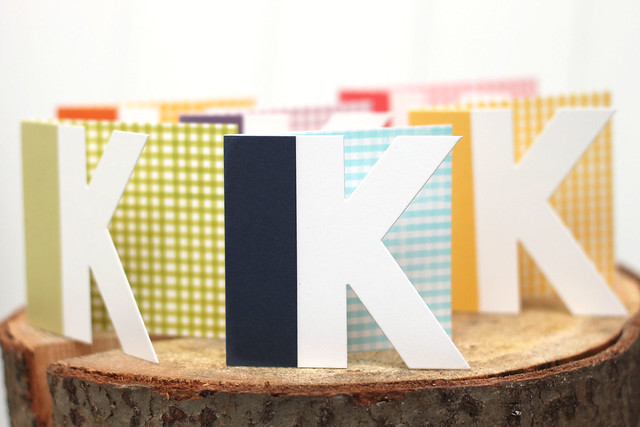
mini monogrammed notecards

Mornin'!

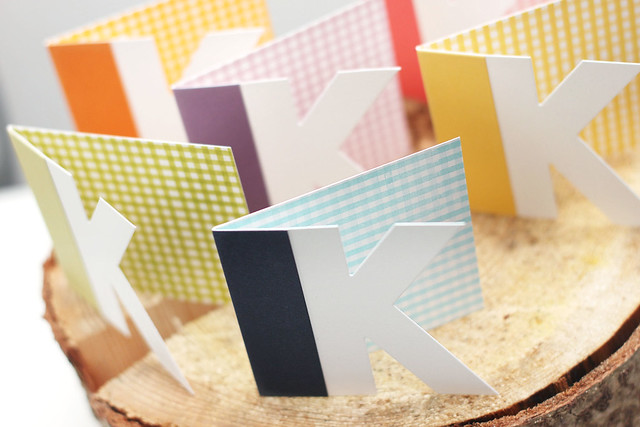
Today's CSS group project is all about alphabets.  I'm showing off the new, amazing larger alphabet dies with a monogrammed 3x3 notecard set.

mini monogrammed notecards

I started out with a 3x3 inch plain white folded card, and partially die-cut the K into the top so that it remained one fluid piece.  It looked cool just plain white, but I added a bit of extras :)

mini monogrammed notecards

a different-colored gingham inside each card,

mini monogrammed notecards

and a strip of matching cardstock to accentuate the cut-out letter on the card-front.

mini monogrammed notecards

It's all packaged up and ready to go!

Check out the other amazing all-about-alphabet projects:

Thursday, February 7, 2013

smarty pants bookmarks & an invitation for you (yes, you!)

Hi friends!

I am so excited to share my projects today - I have a set of valentine bookmarks, and an invitation to something special right here on the blog!

As soon as I saw the CSS "airmail" set, and the pile of books images, I knew what I wanted to create:

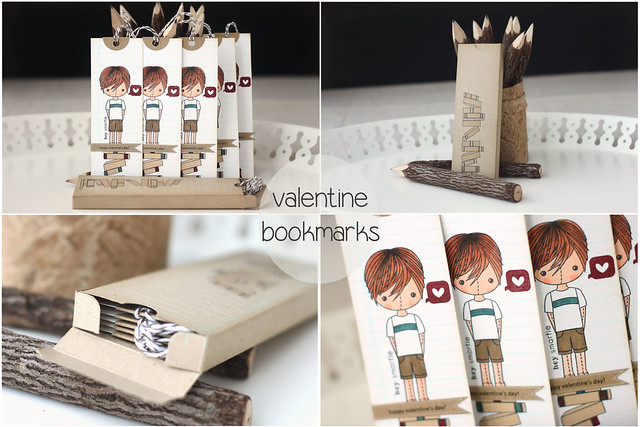
valentine bookmarks

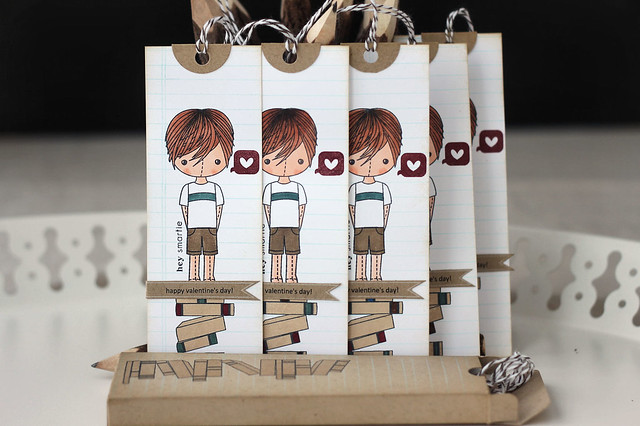
Hey smartie!  happy valentine's day!

I used rag doll Jake, taglines: critters, and the airmail set to create my bookish valentines.

valentine bookmarks

I first stamped Jake, the selectively inked up only some of the books.  I colored, added elements from the critter set (the speech bubble and "hey smartie" sentiment) and added a notebook paper background.  Where the rag doll and the books meet made for a sloppy edge, so a printed sentiment was placed to cover that up.  For fun, they all fit perfectly inside the party favor 7 box.

NOW.  I started this blog 2 years ago.  The encouragement, friendships, and creativity that I have experienced thanks to this blog deserves to be celebrated!  And, I'm getting a little help from my favorite companies to make it extra special!

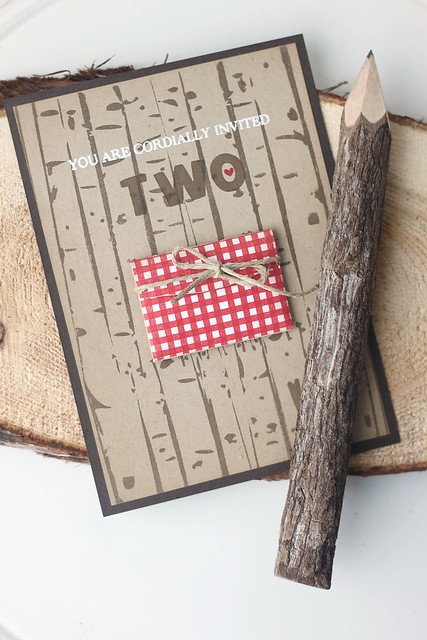
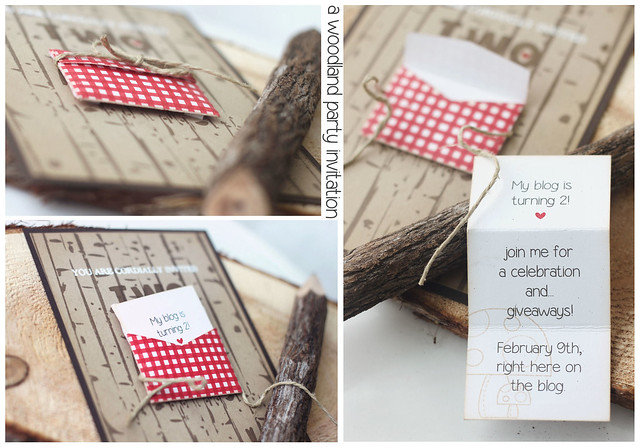
woodland party invite

You are invited TWO (get it?  to? two? I'm so witty) my blog's 2nd birthday party!

woodland party invite

I created a fun invite for the occasion, which perfectly sets the tone for my upcoming party!  I hope you'll come back on Saturday, February 9th and celebrate along with me!

Supplies for the invitation include:
- designer lines to create the gingham
- birch trees for the wooded background
- alpha duo for the t-w-o
- rag doll scene 1 for the adorable mushroom image on the invitation details
- taglines: critters for the tiny heart images

These designers have created things for you today too:  Lori Laurie Kim Laura CSS

Tuesday, November 20, 2012

mmm.... thank you


With American Thanksgiving just days away, the CSS team is showing off our best "thank you" cards.

I thought I would make a little something to send to the gals who participated in the cookie exchange party that my sister and I hosted together.

If you missed seeing the full party, click *here.*

And it all started with an invitation - click *here* to see the beginnings of our cookie exchange paperie.

If you host a party, and prep all of your own decorations, here's my best tip for you: use parts of the decoration to create quick and easy (and matching!) thank you cards.

I deconstructed the candy cane striped background from one of the leftover voting cards, found an extra tree-shaped cookie image that I had never used, and gently peeled the "mmm..." banner from one of the cookie labels.  Even the holiday twine was re-purposed!  I removed it from a voting card, and used it to thread a festive red button.

The only stamping I did was to stamp the text background on the main panel, and add the "thank you for coming" sentiment, from "favor flags."


Just for fun, I added a snowflake pattern to the envelope - which is A4 sized, to match the thank you card.

So, happy thanksgiving!  And also, see?  creating thank you cards can be so quick and easy!  I hope I've inspired you to create and send out handmade thank you cards after your next party.

Grab a mug of hot something and enjoy your visit to these blogs:

Friday, November 16, 2012

christmas cookie exchange party

Candy cane stripes, forest green banners, and softly-browned cookie colors were my inspiration for creating the decor for our Christmas cookie exchange party:


 If you are thinking about hosting your own cookie exchange party, here are the details to remember:

- invite more people than you think: not everyone likes to bake, or will be available to come.  I invite a dozen ladies, and ended up with 8.  (If you missed yesterday's post, click *here* to see the party invite.)

- each guest should bring 1 dozen cookies for each person in attendance, plus an extra dozen for sampling at the party.

- pull out some of your own Christmas decorations to set the festive mood, and have the platters set out before your guests arrive.

- since we hosted our party very early in the season, I encouraged my guests to bring cookies that would be suitable for freezing.

- do what we did, and turn the party into a fun contest!  I created voting cards and award ribbons... in the end, "best tasting" went to my sister, for her yummy peanut butter buckeyes...

- it was a very fun-filled evening with friends & sweet treats, and I have a fully stocked freezer ready for holiday gifting, as well as 7 new cookie recipes.


And, if you are crafting your own cookie swap decor, here is a link to the stamp sets you'll need from the Clear & Simple Stamps storecookie bake, designer lines, favor flags.

If you have a minute, I'd love to know if you'll be participating in your own holiday cookie exchange party!

Thanks for stopping by to take a peek at ours :)


Thursday, November 15, 2012

cookie exchange party invitation

I hosted a cookie swap over the weekend!  I'm showing off the invite today, as kind of a teaser, before I show off the whole party tomorrow...

When I put out the idea for a cookie exchange in November, I thought my friends would think I was crazy, but apparently we're all smart ladies, who would rather take it easy come December... you know, relax and enjoy the holidays and all that... *wink*

So, right now, I have 9 dozen cookies freezing comfortably, waiting to be defrosted for gifts or whatever (and by whatever, I may mean just for me...) It's like the heavens open up every time I peek into my freezer - all of those beautiful cookies!

As with any party decor, repetition is key to creating a pulled-together look.  So, this invite is the jumping off point for all of the decor you'll see tomorrow.  I used 3 CSS stamp sets to make Christmas come early: "cookie bake," "designer lines," and "favor flags."

I created a candy cane-striped base, and added a texty layer overtop (I adore that background strip from "cookie bake" - it just lists all kinds of different cookies!  What could be more perfect if you're hosting a cookie exchange?)  

My favorite part of this card (and I love it so) is a toss up between the green sentiment favor flag, and the white enamel accents on the christmas tree cookie image.  It looks like those edible pearls you'd see on a yummy gingerbread cookie.  It's the little things that make me happy :)

I tucked the when-what of the party onto a second tag shape... I love the personal touch of handwriting on a card, but I don't think everyone needs to see it front-and-center, either... hee.

If you are thinking of hosting your own cookie bake party this season, do it!  Here are the cookie swap basics:

-your guests come with their pre-baked cookies and the corresponding recipe (1 dozen x the number of party guests, plus an additional dozen for sampling at the party)
-you get to spend quality time with your best lovely ladies before the holiday rush, eating delicious treats
-you leave with enough cookies to gift out to teachers, neighbors, yourself (did I really just write that?  i have no shame...)

And, you can do what we did and turn it into a fun contest!  I won't give away too much, but I was voted best looking.  Er, my cookies were...

Hope to see you back here tomorrow!

Tuesday, September 25, 2012

hey sweet thing!

Sooo, I think my new favorite challenge is 1-layer cards.  If something doesn't look right, I have to start all over, instead of just figuring out what else I can slap on there (oops, did I just give away my best design secret? ha.)

This week's CSS style-watch was all about 1-layer cards.  Inspired by the cards that Amber created, I came up with this:

I started with a white card-base and layered the images as follows:

1.  I placed a strip of painter's tape all around the outside (so that my lined background would have a crisp edge.)  I pressed the tape onto my pants (ok, let's be honest since I crafted in the evening: hot pink joggers) to remove some of the tacky-ness... I wanted to make sure it didn't rip my card-stock when I pulled it up.

2.  I die-cut both the label (from the mini tri-fold 1 die) and the cake from masking paper and placed them on the front of the card.  The cake die sticks out past the tri-fold die on the sides and the bottom, so I had to have both of them on there at the same time.

3.  I stamped the lined background (from designer lines), and then, before removing the sticky-papered-die-cuts, created stitch lines all around.

4.  I then removed the sticky paper, and stamped the cake (from cake decorating).  I added the button detail to the front of the cake (love that image!) and gave the stand and the buttons a quick color with copic markers.

5. Lastly, I added the sentiment (from sweet sentiments) and glossy accents to the buttons.  I then let it dry overnight, remembering the last smear-incident that happened from handling glossed elements too quickly.

Hope you like my 1-layer card!

Until next time...


Tuesday, September 11, 2012

playdate café challenge #148

Hi all!

What's peach and navy and grey all over?


(since you're here to see a card, the answer may be a little redundant...*wink*)


I'm loving the color combo for the current Play date Cafe Challenge!  Apart from the fact that my argyle didn't turn out *perfectly* I love this card.  I started out stamping a piece of white cardstock with a peachy-pink and grey argyle pattern (from CSS' "designer lines.")  Next, I cut a 2.5 inch circle opening into that mat, and stamped a little hot air balloon scene (from CSS' "across the miles") inside, all in grey ink.  The main hot air balloon was stamped, colored, and cut out separately.  I propped it up on foam squares.


The card has a lot of dimension.  The sentiment banner was also adhered with foam squares, as was the entire argyle piece.  I adhered everything to a navy blue card-base (I can't remember the last time I used a card-base that wasn't white, cream, or kraft!  yay me!)

One final note: I don't want to seem crass, or belittle the memory of 9/11 with words that seem trite.  My thoughts today are with the families and survivors of the tragedy... it seems impossible that 11 years have passed.  I remember being at work, listening to the news on my radio, and then being invited to watch the news on the tv in the test area (I worked in a pharmaceutical company pre-babies, and the subjects enjoyed a big-screen tv while they were injecting test medications...)  My heart stayed in my throat for many days... but what I remember, almost as vividly as the horror of the attacks, is the coverage of the many rescue workers and first responders who flocked from all over to help recover bodies... I remember reading that church attendance was higher in the aftermath, and that people were focusing on their home life... The patriotism, the unity - it was brutal and beautiful to watch, all at once.  I will be praying for those still affected by the 9/11 attacks today, and taking the time to think on what's important in life: my God, my family, and my fellow man.

"Peace I leave with you.  My peace I give to you; not as the world gives, do I give to you.  Do not let your heart be troubled, nor let it be fearful." John 14: 27