Friday, July 4, 2014

Shark party...rah!

I have a TREAT for you today.  I helped out with not one, but 2 shark parties in the last little while, and I'm sharing the more recent one with you today.

It's always fun to work with Marlyn (of Montreal Confections) and we put together a shark party table for her 10 year old son, Ryan.

shark party... rah!

I love the watery darker blue tablecloth that Marlyn picked up, and the grass mat that she hung for the backdrop.  I talked with her about layering, and she picked up my tips like a pro.  The pop of the white runner is key to keeping the table looking clean, and the netting and ruffled banners add extra interest to the backdrop.

shark party... rah!


The cake is stunning, and the most eye-catching thing on the table. It's my favorite Marlyn-made cake so far.

shark party... rah!


I mean, CRAZY.  She made the shark panels ahead of time, and will teach us how to on her You Tube channel someday soon. I'll come back and add the link once it's up.

shark party... rah!

Cookie cake toppers are my new fave. We did the same on Thomas' BBQ cake a few months ago and I love how it looks here too, with the buoy "0."

shark party... rah!


Gummies to match the table...

shark party... rah!


Some questionably dangerous water...

shark party... rah!

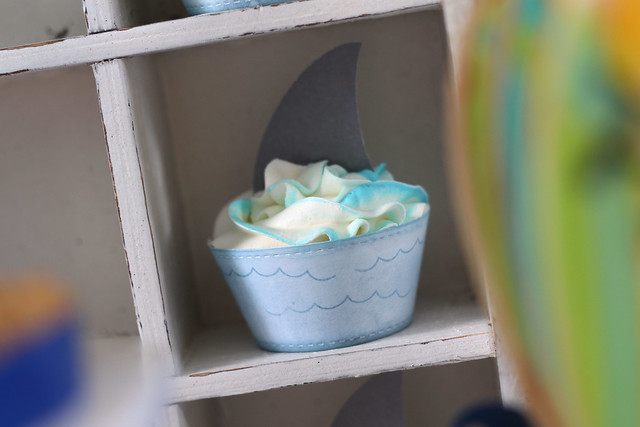
The cupcakes are so fun, with hand-stamped wrappers and two-tone ruffled icing.  I think I see a shark lurking in there...

shark party... rah!

Did you notice how the cupcake display worked to frame the cake? I love how that turned out, and so different from the last time Marlyn and I used these cupcake cubbies (remember Jessika's woodland party?)

shark party... rah!


The surfers who mysteriously disappeared left behind but their personalized boards...

shark party... rah!

We stuck the cookie-surfboards into a styrofoam block that I covered with paper to match the party. The brown sugar sand covered the top of the block.

shark party... rah!

The cookie favors are so cute!  I created a wavy border to hide the base cookie, and added a bag topper with just the tiniest pop of red to match the rest of the party. The sign was found online - I printed it out and tucked it in behind the waves.

shark party... rah!

An out-of-the-bag look at these amazing shark cookies. Marlyn swears they are the easiest thing to make! She'll have the tutorial up for these today - I think they are fantastic!

I hope you've enjoyed this peek into Ryan's shark party! The beach is now closed.

shark party... rah!

♥.

Thursday, July 3, 2014

mama and me crafting.

Mama and me crafting

Did you see that Mama Elephant has a new monthly challenge blog?  I was checking it out the other morning when my 9 year old daughter, Sofia, popped up behind my left shoulder and said:

hey! a contest? can i enter?

I set her up with all of my Mama Elephant stamps (wow, you have a lot of them, mom!) and let her choose what she thought would work with the inspiration photo.


She settled on Tree Friends, because she thought the fringed top on the inspiration favors looked tree-like, and I showed her how to stamp her elements onto scrap paper until she was happy with the placement.  She asked my advice a few times (do you like the sentiment here or here?) and then off she went, stamping and coloring. She was concentrating so hard she never noticed that I snapped a quick picture:


The finished card is amazing. I think it shows so much growth, that she held back from adding more and more onto the card (I'm trying to think what you would do, mama!) and even kept her cool to figure out how to hide a stamping boo-boo.

Mama and me crafting


She tested copic colors to match the inspiration photo (although she wasn't happy with the lack of a lime green color for the leaves) and purposefully leave some of the elements on the tree white.

Mama and me crafting

Her hand shook when she stamped the falling flower, but I challenged her not to scrap the entire project right away. I can just pop another flower on top, can't I? She's so smart. You'd never have seen the mistake if I didn't take a photo from this angle.

She brought in some blue with the patterned paper background, and gold with the washi strip at the bottom.

If you are as impressed with what she's created as I am, leave Sofia some love! I know she'll be thrilled to read your comments.

♥.

Wednesday, July 2, 2014

be protected {mama elephant designer series}

Hi there, I'm back with my second post of the day! I'd love if you scrolled down to see my Avery Elle guest post.

I'm showing off a card I made with Mama Elephant's in my heart and the new starburst creative cut.

may you be protected

I always thought the little boy looked like he was praying, and I love the sentiment from the same set.  I die-cut the starburst cover plate and nestled the sentiment into the space between the stars.

I connected the sentiment to the boy below by way of a hanging star (from the set Splendid.)

may you be protected

To make the sky look a little hazy, (after sponging and rubbing on the distress inks for the sky color,) I took an eraser and started to lightly remove some of the color. I love the effect that it gave!

I mounted the coverplate on foam squares to the card base, so that the yellow paper I adhered to the base would show through the starry peepholes. For a last touch, I added some of the cut-out stars - starry confetti is my new fave.

Thanks for stopping by!

♥.

happy birthday wishes {avery elle guest designing}

I'm so happy to be guest-designing with Avery Elle this month!

Today, I played around with the new balloons stamp set and coordinating dies, pairing it with a previously-released favorite, red & goldie.

happy birthday wishes {avery elle guest designing}

Goldie is all dressed up for a party, and bringing one huge balloon with her.  I stamped the balloon twice, so that I could get a really saturated color. I love being able to do that with clear stamps!

happy birthday wishes {avery elle guest designing}

The "birthday wishes" sentiment is from red & goldie - I thought it fit the space so well, sneaked in there. The overlap of the balloon string and the sentiment is my favoritte.  The starry accents surrounding Goldie are from party animal.

I hope you like my first Avery Elle project! I'll be featuring AE every Wednesday this month, so I hope to see you back.

Before you go, you might like to check out  *this card* where I played with Red and her not-so-menacing foxy/wolf. hee.

♥.

Monday, June 30, 2014

time to go bananas! {a banana split party}

The lawn fawn team is partnering with xyron this week, to bring you fun projects made possible using their adhesives.

On the last day of school, I presented my kids with an invitation to a banana split party.

go bananas!

They were so sleepy and hilarious when they read the back of the invite.

go bananas!

It said: we're so proud of you for all the hard work you put in this year...but now that school's out, it's time to go bananas! when you get home, there will be a party waiting for you - cake! cookies! cousins! and don't forget to BYOB: bring your own banana.

go bananas!

They gave weird, tired smiles and went to school. I waited until Maia's naptime to set this up:

go bananas!

I wanted it to be a fun surprise when they walked through the door/woke up from the nap.

go bananas!

I love the cherry on top of each letter, all glossy and cute.  I used a brown gel pen to flick some spotty banana dots on each letter, and a white gel pen to create a fun highlight as well.

go bananas!


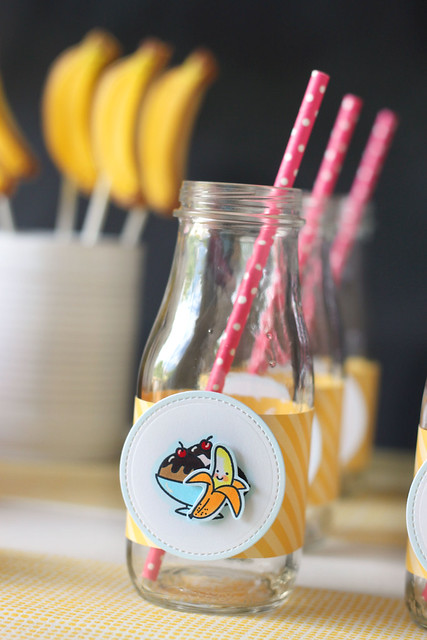
I crafted the bottle labels to match the invitation. Ice cream sundae + banana, and on the stitched circle to match the banner.

I found the polka-dotted hot pink straws at the dollar spot in Target ages ago, and they worked perfectly here! I also found these yellow corn holders in the dollar spot, just a few days before this little party.  I thought it looked banana-ish, to hold a trio of cakes each:

go bananas!

These cakes are wonky, but so yummy. I baked up one recipe of banana-caramel cake and then used scraps to create these tiny cakes. With a gumball on top, they were the kids' choice.

Speaking of cake,

go bananas!

yup. you are welcome.

go bananas!

They were delicious.  And, thanks to my friend Marlyn (Montreal Confections), I had the sweetest bunches of banana cookies to display at the party. Spotted bananas never looked so cute.

go bananas!


My favorite party craft, has to be the hats.

go bananas!

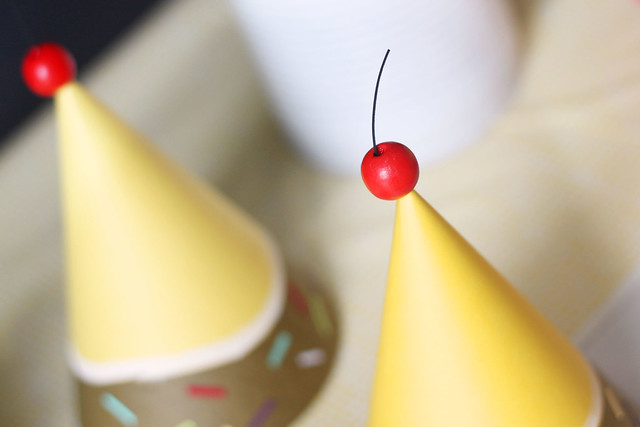
Banana split party hats, with a cherry bead on top.

go bananas!

I hot-glued the bead to the hat, and then just cut slivers of black cardstock for the stem. A dab of hot glue to keep them stuck inside the bead.

I cut myself a wavy stencil (out of post it strips) and sponged brown ink all over the bottom of the hat. Then, using a white gel marker, I added a white layer over that one before adding tiny paper sprinkles all around.

My niece was the only kid who was nice enough to stop for a picture. She literally froze this way for the minute it took me to get my camera and shoot the picture. ha. It was so weird and fantastic, all at once.  My sister has them trained.

go bananas!


I hope you like it! We went bananas!

♥.

Thursday, June 26, 2014

hang in there {lawn fawn inspiration week}

On the last day of lawn fawn's june inspiration week, we're re-visiting sets that have been given new coordinating dies: critters in the burbs, critters on the farm, plus one, and critters down under.

I couldn't pass up the opportunity to craft with the tree-hugging koala.

I made a card almost 2 years ago with this koala, and I can't believe I hand-cut everything like a chump, but it's still one of my favorite cards.  It's one that got me noticed by lawn fawn, and I'd like to think it started me toward my spot on this amazing team.  click *here* to see it.

But today.

It's all about celebrating the awesome laziness and perfection that comes with owning matching dies:

hang in there {lawn fawn inspiration week}

I started out with a white panel of cardstock, on which I stamped and masked and masked and stamped to get a nice layer of trees. Oh, and before all of that stamping/masking, I put down a post-it-strip across both the top and bottom of the panel. Do you see how the tree bottoms are cut off? I love doing that - it makes it look like a print instead of a homey-homemade card, especially because I added a wash of blue around the trees in between the post-it-strips.

hang in there {lawn fawn inspiration week}

Once I was happy with the trees (are you saying "happy little trees" now? I am. ha. I used to watch that painting show all the time as a kid) I then popped the koala on there. I adhered the bottom of the tree directly onto the cardstock, lining it up with the stamped trees, but using a foam dimensional under the koala.

hang in there {lawn fawn inspiration week}

I stamped the custom sentiment using Milo's abcs.

I hope you like it! There's more to see on the lawn fawn blog today!

♥.

Wednesday, June 25, 2014

you'll never know {lawn fawn inspiration week}

Another day of lawn fawn inspiration is coming at ya! I always love it when lawn fawn comes out with new alphabet stamps, and this one is such a great size! A little bigger than the other solid alphas, Clark's abcs is perfect for building custom sentiments.

you'll never know {lawn fawn inspiration week}


I made a sing-song of card, using the new clark's abcs and the deer from into the woods.  I stamped all of it onto the 4x6 journaling card and did my usual thing by coloring the impressed outline with a brush-tipped marker.

you'll never know {lawn fawn inspiration week}

This deer makes everything cuter.  I hand-drew the grass beneath his feet, to ground him and add a touch of whimsy.

I hope you like it!  Visit the lawn fawn blog to see more amazing samples by the design team.  I think today may be my favorite bunch of projects!

♥.