Saturday, December 29, 2012

What a year! {top 12 of 2012}

I'm sitting here, typing up this year-in-review post, and desperately trying to make sense of the idea of another year over.  I feel this way every December.  Where did the time go?  What did I even accomplish this year?  How did the kids grow up so much in a year??

In all honesty, I'm not one for big new year's resolutions: they stink of failure after the resolve behind the decision fizzles out.... (I'd rather make my huge resolution in, say, October - and not start out the new year feeling like I've already let myself down.)

But I'm a firm believer in looking-back-before-moving-forward.

Sooo, that being said, enjoy this month-by-month look back at some of my favorite projects of the year, before we move into a new year of crafty ventures together :)

Click on any of the photo captions to be whisked away to the original posts.


January:

an early valentine


February:

thank you so much
March:

little chickadees
April:

sewing party invitations


May:

milk & cookies party

June:

gallery idol, round 3 cards
July:

it's what's inside that counts
August:

camping party


September:

a new day

October:

halloween mis-fortunes

November:

snow-globe shake tag
December:

ring in the new year

Happy New Year!  


Friday, December 28, 2012

nailed it!

I'll make this post short and sweet, since we're on the run this holiday season...

I wanted to enter the mama elephant challenge, which ends tomorrow.  It's the first time I ink up these two sets: "midnight letters" and "on target."

nailed it!

Hope you like it!  There's still time, if you want to submit an entry of your own - they're offering a free digi stamp if you don't already own their stamps.


Wednesday, December 26, 2012

JOYful resolutions {CSS group project}

Happy day-after!

if you're anything like me, you're living inside of a sugar overdose... I still can't believe that Christmas has come and gone!  It was such a wonderful time spent with family and friends, sharing gifts, making memories, and eating more food than we ever thought possible...

As we sail towards the year's end, and start thinking about our new year's resolutions (getinshape*cough*getinshape), some of us over at Clear & Simple are showcasing the limited edition JOY stamp set and offering our own crafty resolutions for 2013.

new year's eve party


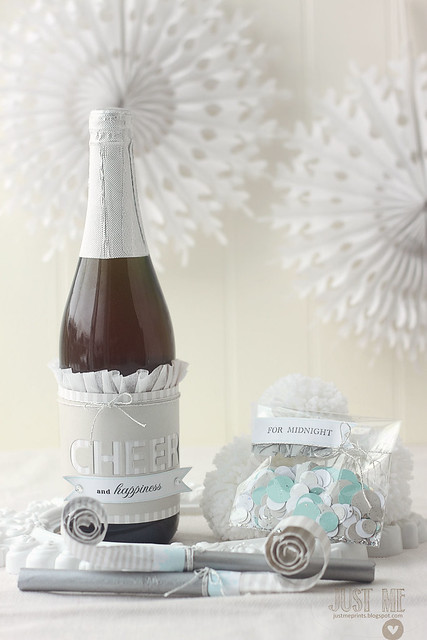
I've created a little something for the midnight ring-in.  An embellished bottle of bubbly, (actually, sparkling apple juice here, since we'll be serving it to the kids) a little confetti pouch, and re-worked party blowers.

(of note: last year, we set all of the clocks back so that the kids thought they were staying up until midnight with their cousins, when in reality, we had them all in bed by 9pm.  We did a fake countdown and everything.  I don't know if we were bragging a little too loudly, but Sofia found us out.  whoops!  This year, we're staying in and letting our kids stay up as late as they want.  I look forward to watching them drop like flies somewhere around 10:30pm... my husband thinks I'll be falling asleep on the couch by that time and leaving him to entertain the 3 musketeers.... I suspect he may be right.)

new year's eve party
To create the embellished "wine" bottle, I cut into a sheet of silver cardstock to spell the word "cheer" (yes, a play on the usual glass-clinking "cheers") using the uppercase alpha dies, and backed it with a piece of very subtly striped patterned paper.  For a bit of extra frill, I adhered a strip of double-stick tape to the back of the patterned paper and gathered a length of white crepe paper, so that it looked ruffled from the front.  A bit more double-stick tape was used to adhere it all to the bottle.  To bring in a bit of blue to my bottle, I stamped a favor flag die-cut with the coordinating frame image, and stamped the "and happiness" sentiment from the limited edition "JOY" stamp set.  Some blingy rhinestones and silver cord finished it off.

new year's eve party

For the midnight toss (doesn't everyone want confetti at midnight?  uh, maybe not the parent who'll have to clean it up, hee, but we'll allow it anyway...) I cut circles of various sizes from "my style blueprint," "silver," and "a blanc check" cardstocks.  I threw in a little coarse silver glitter at the end.  I knew the package would be ripped into, so no need to make a fancy topper.  A little creative inking (I nabbed the "for" and "midnight" from 2 different sentiments in the favor flags set) gave me a custom sentiment, and I framed it in blue to match the bottle label.  A little ruffling of silver tissue paper and silver cord also tied back into the embellished bottle.

new year's eve party

The party blowers will be a sure hit!  I brought home a pack of really gaudy blowers from the Dollar Store, and immediately took them apart to make them more beautiful.  After taking apart the blower, here are the steps:

step 1: cut a length of silver tissue paper to size and wrap around the blower base.  adhere with double-stick tape.
step 2: using the original blower's paper (the part that rolls and unrolls) as a guide, cut a length of computer paper to size and fold as indicated by the original.  stamp a design (from "designer lines") before using scotch-tape to secure the paper closed.  roll the paper, and secure it with a small clothespin (or rubber band, or paper clip or anything like that) for a few hours (this will help it to keep the rolled shape.)
step 3:  secure the base to the blower.  I stamped a strip of white adhesive paper with a starry motif from the "sweet dreams" set and used that to adhere the two together.
step 4: try it out - works like the real thing!

My crafty resolution for 2013 is to collaborate more with other artists.  I have reached out to several local artists, and I hope that party season 2013 will be its best ever ;)

A few of my fellow CSS designers are also sharing their own crafty resolutions: Dana Lori CSS

Thanks for stopping by!

Monday, December 24, 2012

merry christmas!


Hark the herald angels sing
"glory to the newborn king!
peace on earth and mercy mild,
God and sinners reconciled"
Joyful all ye nations rise,
join the triumph of the skies,
with angelic host proclaim,
"Christ is born in Bethlehem!"
Hark the herald angels sing,
"glory to the newborn king."


with love and a "merry Christmas" from our home, to yours ♥


(the beautiful photo of my kids is thanks to Tanya Zaleski.  Maia is ever-marching to the beat of her own drum, Thomas is stroking the batman t-shirt underneath the dress-shirt, and Sofia is my gorgeous, and photo-loving princess.  xoxo, Tanya, for capturing this fun moment!)

Friday, December 21, 2012

teacher gift #2: snowman card + cookie set

Hi all!

We're in the home-stretch before Christmas, and it's so sad - the only presents wrapped and under the tree are some brown paper bags that the kids decorated for "mommy" and "daddy."  They're so excited to have put together a present for each of us, it's adorable!  Time for this mommy to get to work so they could see some presents of their own under there!

Yesterday, I shared a gingerbread cookie jar and matching gingerbread tag.  Today, Marlyn & I are at it again!  We thought it would be so fun to create a card set and coordinating set of cookies...  I give you, the "build-your-own-snowman card & cookie set":

build-your-own-snowman

I packaged the build-your-own-snowman card kit in the bottom tin, and secured it to the cookie jar by way of a ribbon.  The ribbon knot and tails were embellished with MFT snowflakes.  The snowman on the front is to show how the ones in the kit could come together.  I used Papertrey ink dies, and a mix of lawn fawn and PTI stamps to make the kit come to life.  I packaged each "snowman part" individually, and labelled each little baggie.  (If you know the PTI dies, you'll remember that they don't include scarves for this snowman, but it wasn't too hard to hard draw and cut out a set... and he looks so much cozier like that!)

build-your-own-snowman

And the cookies - hee hee.  I had so much fun playing around with them!  Marlyn did include some bigger circle cookies, but it made me laugh when I lined up 3 the same size :)  She thought of everything: eyes, carrot noses, buttons, different hats, there were even a few ties!

I hope you like it!  Thanks for stopping by!

Thursday, December 20, 2012

sweet teacher gift #1.

I know I keep posting things that Marlyn creates, and you must think I'm slightly obsessed.  It's true.

We teamed up to create cookies that matched Papertrey Ink's "boards and beams" set *here.*

And now, we're bringing the lawn fawn love.  Marlyn created the cookies based on lawn fawn's "sweet christmas" set.  
sweet christmas gift
Aren't they the cutest little gingerbread people?  If only every teacher could get such a gorgeous gift for Christmas ;)

I'll be back tomorrow, sharing another paper+cookie teacher gift.

In the meantime, if you're keen to know more about me, Wida has a whole post dedicated to me on her blog today.  Pinch me!  I was interviewed for her next installment of "diagnosis design" - which I think is such a great idea!  I'm honored to be a featured artist.  There are even pictures of my craft room (gasp!) and very kind testimonials.

See you tomorrow!

Wednesday, December 19, 2012

a bundle of joy.

I have an adorable baby card on the app today, using the new limited edition "joy" set from CSS.  It's already being enjoyed by a set of new parents who look so comfortable in their mommy/daddy roles.  sigh.  I was a trainwreck when I had Sofia.  a nervous/don't-really-know-what-I'm-doing wreck.  How do some people manage to look like new-parenthood isn't a big deal at all? hee hee.


Thanks for popping by!

Tuesday, December 18, 2012

Color-your-own-cookie

If you're looking for something fun to do with the kids in the days leading up to Christmas, I thought I'd share the fantastic gift that Marlyn (of Montreal Confections) dropped off this weekend.

Color-your-own-cookies!

color-your-own-cookies

Sorry for the not-so-great photos, but I just snapped a few while the kids were tearing into the box of cookies, and the set of edible food markers that were gifted to them as well.  They each colored (and gleefully ate!) a few cookies.  It is such a cool holiday present!

color-your-own-cookies

Thomas didn't waste too much time, and his smile is more of a "ok, mom, can I just go ahead and eat it already?"

Sofia, on the other hand, colored a more intricate design:

color-your-own-cookies

I'm not quite sure what's going on with the "love me" and "love you" on the girl's dress, but as long as we're in loving moods, I'm not sayin' anything.  (by the way, do you see the little bite she took off the foot?  yeah, as she was coloring, she nibbled a bit.  That was hilarious to see - the little artist, carefully coloring in the lines, and then taking a dainty chomp out of the foot.)

color-your-own-cookies

Thanks, Marlyn!  We loved it!

Monday, December 17, 2012

Make it shine & art kits for Newtown, Connecticut

It's our last lawnscaping challenge of the year!  We're asking you to break out the glitter, the rhinestones, the mists - anything you can think of to give shine to your end-of-year project.

make it shine!

I tried to give my whole tag a bit of an ethereal feel, with not only the glitter strip at the bottom of the tag, but the vellum snowflake that sits behind, and the white-heat-embossed polar bear (from "critters in the snow").

After I heat-embossed the polar bear, I colored him in with a white paint pen (a white, "galaxy marker" by american crafts.)

I stamped snowflakes around him, and ended off with a dark grey sentiment to match his cute polar bear nose.

I hope you like it!  Your turn to come up with something even better:


and this week, we're sponsored by Lawn Fawn!  You could win a gift certificate to shop in the lawn fawn store, just in time for Christmas:


On another, more meaningful note, my friend Amber is doing a wonderful thing for the grieving kids of Newtown, Connecticut.  I have 2 school-aged children myself, and have wept and prayed for the parents whose arms will feel extra empty this holiday season, and for the kids who have been scarred by this tragedy.  Being crafty herself, Amber is seeking to put together art kits to aid in the healing of these children.  If you're an international, like I am,  you might just want to donate some money instead of sending over the goods she's listed.  There's a button for that on her blog.

If you think this is a great idea, like I do, I hope you'll share Amber's post.

Thank you, and have a great Monday!

Saturday, December 15, 2012

Noël.

Hi friends,

I'm posting over at the Precious Remembrance blog for the last time this year!  If you are sending out handmade cards this year, I'm guessing they are all already made, (unless you're like me, and the photo-cards you ordered are still sitting in a pile on the dining room table, waiting to be addressed and mailed out... *insert guilty face here*) but here is a final Christmas card for your viewing pleasure:

noel

I created the "noel" mat with my cameo silhouette, and stamped the Precious Remembrance ornament at the bottom.  The ornament hangs on by a string (I used the wavy snowdrift image from lawn fawn's "let it snow") which creates some visual interest going up the card.  I didn't want the wavy line interfering with my "n-o-e-l" letters, so I masked them off before stamping.  After coloring parts of the ornaments in shades of brown and red, I gave the whole mat a bit of texture with pti's canvas impression plate.

noel

A last little detail was to add glossy accents on the ornament stars.  It's such a fun way to add some extra wow without being too fussy.

Have a great weekend, all!

Friday, December 14, 2012

merry wreath.

I'm on my last leg of Christmas cards, people.  Have you all sent yours out already?

merry wreath

It's not a new idea, but I created a Christmas wreath using a leafy image (from Paper Smooches "reflections" set.)  I traced around the inside of a scor-tape roll and made sure that the stem part of the leaf image followed that curve, overlapping them a bit.  I stamped off onto a sheet of scrap paper to get the lighter impressions, and fill in any gaps.  The little "berry" images are from the same set.  The "merry" sentiment was cut out using my Cameo Silhouette.  I love that while I created the card, the machine cut out my sentiment, and 11 others (since I taught this card in a recent class.)  It's like magic :)

It's a simple card, but if you're still making cards this late in the game, they'd better be fairly easy to put together, right?

I'm sharing another simple Christmas card tomorrow, and then that's it for Christmas cards!  We'll be moving into the gift-packaging and off-blog-baking portions of holiday craziness.

See you tomorrow!

ps. someone pointed out to me that the "pin it" button hasn't been working.  I think I fixed it, but if there are still issues, please let me know!

Wednesday, December 12, 2012

What we've been up to...

We don't have a Christmas tree up yet.  And, this is huge, considering we usually have it up the day after American Thanksgiving.  

As of this afternoon, this is our living/dining room (yes, we do have a tiny home):

When the new moldings were first going up, without any paint on them, Sofia declared that she hated them, and would be "embarrassed to have any friends over ever again!" Oh dear, someone turned into a ball of hormones and chose renovation time to let us know...

But, aren't the new crown moldings so pretty?  In case anyone would like to know, the wall color is Benjamin Moore's "edgecomb gray" - and is a bit less taupe in real life.  We've also "crowned" and painted our kitchen and little powder room, in BM's "boulevard" - a deeper, and more mauvy grey.  Very pretty.

Apart from the Christmas decorations, I'm most excited about having my dryer hooked up again.  A family of 5 does not function without a dryer in the winter... there were not enough surfaces to lay out our wet clothes this afternoon...

One thing that hasn't changed:


The chalkboard wall is here to stay.  And semi-dressed for Christmas.  The kids were thrilled to come home from school and find the advent calendar moved to the kitchen.  Days 1 through 12 were opened upstairs in our bedroom.

It's a beautiful life!

Tuesday, December 11, 2012

a CASE for JOY {CSS group project}

Hi peeps!

When the busy-ness of the holidays starts to set in, CASE'ing (for you non-crafties, it stands for "copy and selectively edit") a favorite project can be the way to kick-start some creativity, without having to start from scratch.  We're refreshing our favorite oldies, using the new limited edition Joy set.

Since we're personally in the middle of some home renovations (which is upsetting our kids to no end, because they're convinced EVERYONE else has their Christmas tree up already), this group project was right up my alley.

Do you remember my "apple of her eye" ensemble?  with the apple-appliquéd onesie and handmade bib?  Click *here* for a refresher *wink*

I decided an entirely girly set was in order:

Bundle of JOY

I created a strawberry set, featuring a card with matching envelope, and a gift box... with a gift inside.

I'll show off the gift, but first things first:

Bundle of JOY


I used the strawberry appliqué die and, instead of making a strawberry shaped card like I've done in the past, offset it onto a white card base for a bit of a different look.  The "welcome baby" sentiment (from "trendy tags") was stamped onto a favor flag die-cut, and stripes (from "create a plaid") were added above and below to complement the custom-stamped envelope liner.

Bundle of JOY

The party favor 4 box was stamped with the same stripes as the envelope liner, and I added a tiny strawberry to carry the theme (from "perfect harvest").  From the new "Joy" set, I stamped the "bundle of joy" sentiment.

And now, inside the box (if you've been waiting for this, go on and add a drumroll):

Bundle of JOY

I couldn't very well CASE my previous project without creating a new appliquéd onesie!  I picked up a plain pink onesie from Walmart (where were these when I had newborns?  I've never seen them at Walmart in nice colors before!) and stitched many layers of fabric together for this strawberry appliqué.  I wanted it to have a quilted look.  I've already sent the whole thing through the wash, so that the edges could look a bit ragged and soft when I gift it out:

Bundle of joy

I hope you like it!

These designers are CASE'ing their way into fantastic projects today:

Kim Lori Laurie Jaclyn Jennifer Dana Tracy ♥ CSS


Friday, December 7, 2012

naughty or nice?

Hi peeps!

Just a quick one for today - a fun card from last weekend's card-class:

Santa's list

I used a little Wplus9 sentiment (from their little "dear santa" set,) and stamped it onto a notebook page die-cut... and, my favorite part of the card? The bossy Joscie flair I ordered especially for the class :)  Isn't it adorable?

Santa's list

The "naughty or nice" sentiment was printed via my computer, and I stamped a speech bubble (from lawn fawn's "a birdie told me" around it.)

Have a great weekend!

Wednesday, December 5, 2012

holidays tags... in 10 minutes!

holiday tags in a hurry

I'm thrilled to be joining the fun over at Pretty Pink Posh for a special edition of the 10 minutes craft dash!


You have from now until December 15th, to create a fabulous project, and all you have to do is make it in under (or around) 10 minutes, and feature a red element in your project (a no-brainer, so close to Christmas!)

There is a great prize up for grabs: check out Pretty Pink Posh for all of the details.

For my project, I created a set of 3 Christmas tags, using the adorable "no peeking" set by Mama Elephant.  The only thing I did ahead of time was to create a slightly larger cut file of the tag image, and set it to cut in my cameo silhouette while I was crafting.  I ended up with an entire sheet of white tags that I could layer my quick & easy tags onto...

First thing:

holiday tags in a hurry 

Stamp the tag images and the little critters, as well as the hole-reinforcer image.  Took barely a minute.  Then, place masks onto the critters (I ALWAYS create masks when I first receive a stamp set, especially if it involves adorable critter images.  I store them with the stamp set for future use.  It's part of my before-I-play-with-the-set rituals.)

holiday tags in a hurry

Once the masks are in place, grab a sponge and some juicy red ink (I used Fresh Ink, but you could use Distress Ink) and start building up the red color.  I love that this gave me all kinds of shadows and variations of color.  I took my time here - this step took me about 3 minutes.

holiday tags in a hurry

Now, slowly unmask the images.  Perfection!  Stamp the "no peeking" sentiment on each tag, color in the scarves, cut each tag out and adhere to the larger white tags.  Three holiday tags created in 9 mins, 35 seconds...

Then, with the time run out, make some more tags because this was too much fun:

holiday tags in a hurry


If you'd like to see more of me today, I have a card up on the CSS app today:

Click on the image to be whisked away to the app store.

Thanks for stopping by!