Hi friends!
Remember these art party decorations? I had a few requests for a silhouette tutorial on how to take a cut file and turn it into a print & cut. Please, pretty please keep in mind that I am new to the silhouette myself, so be kind.
The video is up on YouTube - click *here*
Lemme know what you think!
Wednesday, January 16, 2013
Tuesday, January 15, 2013
Have a SUPER valentine's day {CSS group project}
I couldn't let Valentine's day come and go without using the rag doll super hero set. And, when I saw *this card* on Joy Taylor's blog, I was inspired to make a black & white version of my favorite rag doll, with the pop of color in the sentiment.
My little Thomas has 20 kids in his class... I've made 10 of these sweet tags so far :) They're tall enough to be used as a bookmark, or to be able to adhere a lollipop to the back.
I started out with a piece of white cardstock, and stamped "super" first. I created masks for just the "u" and the "p" and stamped my rag doll with all of his superhero accessories (his mask, his cape, and his "s" for superhero!) I then borrowed "valentine's day" (I cut off the "it's" from the sentiment, from "sweet sentiments: holidays") and typed up "have a" on my computer.
I hope you like it! A few of the other designers have projects waiting for you as well:
And, there's more me on the CSS app today:
Click on the image to be taken to the app store, where you can download the CSS app for extra, not-seen-anywhere daily inspiration.
Until next time...
Monday, January 14, 2013
Thanks ♥ {Precious Remembrance}
Hi friends,
I am (a little/very) late in posting this today, but with good reason: I only received my "thanks stamp set" in the mail after lunch (grumble, grumble... mailing to Canada is so slow), and couldn't resist settling down immediately to create a card with this fun bunch 'o stamps.
The latest release from Precious Remembrance is my favorite so far. With only a bit of time, I put together a vintage paper/watercolor number for you:

I overlapped the heart on the "thank you" crossword puzzle image, and the one in the "thanks" sentiment. And, for fun, I added a heart from our previously released "positive thoughts" set. I started out by stamping the crossword image in a water-based brown ink (Stampin' Up's "soft suede) onto watercolor paper and smudged everything but the diagonal "thank you" that I wanted to highlight. Once that dried, I stamped the "thanks" sentiment, and the red heart, and masked only the crossword image to be able to stamp the notebook paper image over-top (from a lawn fawn set.)
Hope you like what I've created today! Click over to the Precious Remembrance blog to see what the other designers came up with!
I am (a little/very) late in posting this today, but with good reason: I only received my "thanks stamp set" in the mail after lunch (grumble, grumble... mailing to Canada is so slow), and couldn't resist settling down immediately to create a card with this fun bunch 'o stamps.
The latest release from Precious Remembrance is my favorite so far. With only a bit of time, I put together a vintage paper/watercolor number for you:
I overlapped the heart on the "thank you" crossword puzzle image, and the one in the "thanks" sentiment. And, for fun, I added a heart from our previously released "positive thoughts" set. I started out by stamping the crossword image in a water-based brown ink (Stampin' Up's "soft suede) onto watercolor paper and smudged everything but the diagonal "thank you" that I wanted to highlight. Once that dried, I stamped the "thanks" sentiment, and the red heart, and masked only the crossword image to be able to stamp the notebook paper image over-top (from a lawn fawn set.)
Hope you like what I've created today! Click over to the Precious Remembrance blog to see what the other designers came up with!
Saturday, January 12, 2013
Hoop art gift set {CSS medallions}
I'm so excited to be showing off the newest CSS release: medallions 1 and medallions 2 stamp sets.

I had the best time getting inky and artistic and created full pages of my own designer papers. I changed up the stamps on every sheet, but kept to a grey/beige, pink, and light blue color scheme to make sure that everything coordinated. My best tip for creating diy patterned paper? Stamp the bigger elements first, and then fill in with the smaller ones. And, if you're scared of stamping a random design, why don't you do what I did and evenly space out your medallions? I plotted out my patterns, and erased the pencil lines when I was done.

I've featured the patterns on this card - cut up my diy patterned papers and stitched them onto a raised panel. I also created a coordinating envelope liner.

I used more of my diy paper in this embroidery hoop. I grabbed a naked embroidery hoop that I had lying around, gave it a coat of blue paint and fitted the inside with my favorite medallion design. The sentiment is perfect, and from the CSS set "rag doll mia: banner." I also stamped and cut out a butterfly from the "au naturel" set, to coordinate with my card, which featured another image from that set.
When I set out to create the hoop, I didn't think I'd like it as much as I do - it's on display on my nightstand now, and makes me happy every time I see it.

I hope you like what I came up with! Click over to these designers to see more of what's being released today:
I had the best time getting inky and artistic and created full pages of my own designer papers. I changed up the stamps on every sheet, but kept to a grey/beige, pink, and light blue color scheme to make sure that everything coordinated. My best tip for creating diy patterned paper? Stamp the bigger elements first, and then fill in with the smaller ones. And, if you're scared of stamping a random design, why don't you do what I did and evenly space out your medallions? I plotted out my patterns, and erased the pencil lines when I was done.
I've featured the patterns on this card - cut up my diy patterned papers and stitched them onto a raised panel. I also created a coordinating envelope liner.
I used more of my diy paper in this embroidery hoop. I grabbed a naked embroidery hoop that I had lying around, gave it a coat of blue paint and fitted the inside with my favorite medallion design. The sentiment is perfect, and from the CSS set "rag doll mia: banner." I also stamped and cut out a butterfly from the "au naturel" set, to coordinate with my card, which featured another image from that set.
When I set out to create the hoop, I didn't think I'd like it as much as I do - it's on display on my nightstand now, and makes me happy every time I see it.
I hope you like what I came up with! Click over to these designers to see more of what's being released today:
Wednesday, January 9, 2013
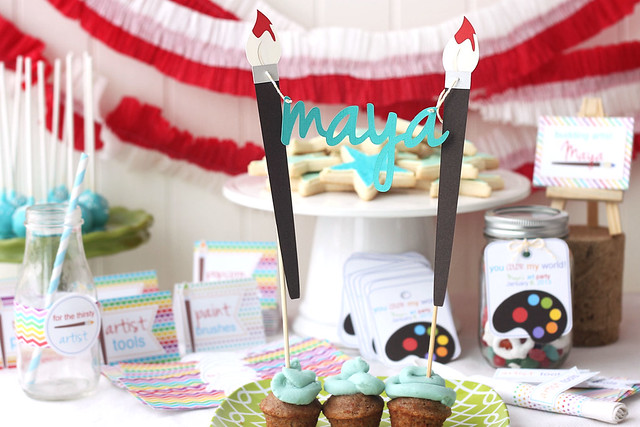
Art party decorations
Over the holidays, I got to know my silhouette a bit better, and created these fun decorations for a special little girl's 4th birthday party.
I love, love, love it when I get to work with the same mama for multiple parties. I created *this* ultra-girly ensemble for Maya's 3rd birthday party.
For her 4th, we ventured into a more unisex and bright art party theme:

Yes, those are the same cake pops I featured on the last post, which were made for our New Year's Eve party - promise they won't be recycled again (mostly because they've all been eaten)
I used this cut file to create all of the decorations you see in this post. I can't tell you how proud I am of myself for learning how to convert the cut file into a print & cut, so that it could be used throughout the party. The digital scrapbook papers were purchased from this shop.
With the paintbrushes being so small on these dessert/tool labels, I didn't want the headache of assembling all of the pieces - turning the file into a print & cut was a great way to go!

The "artist tools" held the kid cutlery together.
Place-cards for each kid, held up on an artist's easel. They were going to be doing some painting at this party!

I hope you like the decorations I made! It was a fun little experiment, and amazing practice with my silhouette, but I did miss getting inky with my stamps :)
If you're new to the silhouette, and would like to know how I turned the cut file into a print & cut, let me know! Maybe I could put together a little tutorial.
Thanks for popping by!
I love, love, love it when I get to work with the same mama for multiple parties. I created *this* ultra-girly ensemble for Maya's 3rd birthday party.
For her 4th, we ventured into a more unisex and bright art party theme:
Yes, those are the same cake pops I featured on the last post, which were made for our New Year's Eve party - promise they won't be recycled again (mostly because they've all been eaten)
I used this cut file to create all of the decorations you see in this post. I can't tell you how proud I am of myself for learning how to convert the cut file into a print & cut, so that it could be used throughout the party. The digital scrapbook papers were purchased from this shop.
With the paintbrushes being so small on these dessert/tool labels, I didn't want the headache of assembling all of the pieces - turning the file into a print & cut was a great way to go!
Love these water bottle labels.
The "artist tools" held the kid cutlery together.
Place-cards for each kid, held up on an artist's easel. They were going to be doing some painting at this party!
The favor jars (I just threw together whatever multi-colored candies I had around the house for this photo, but I think she was gifting jars of crayons) with a brightly-colored tag.
I hope you like the decorations I made! It was a fun little experiment, and amazing practice with my silhouette, but I did miss getting inky with my stamps :)
If you're new to the silhouette, and would like to know how I turned the cut file into a print & cut, let me know! Maybe I could put together a little tutorial.
Thanks for popping by!
Monday, January 7, 2013
a gnomie birthday to you!
We're celebrating the lawnscaping challenge blog's birthday! Time to take out your lawn fawn stamps and get creative: make a card, hand-stamp a gift-wrap, or even make some cute cupcake toppers.
Confession time: I've watched "Gnomeo and Juliet" more times than I'd like to admit this holiday season. I found it on liquidation, and stuck it under the tree for the kids as an afterthought, and they have become obsessed. My 2 year old walks around the house, yelling out quotes from the movie. Oy.
So, it was only natural that I would stamp a birthday gnome for lawnscaping's big day (and then use some leftover cake-pops for the photo-staging, hee hee):
Here's the how-to: Start out by stamping the gnome, from "gnome sweet gnome" and add a little party pom-pom to the top of his hat (really, a puff of train smoke from "pa-rum-pa-pum-pum"). Next step is to mask the gnome and his pom-pom, and stamp the cake (from "bake me a cake"). Add a smiley face to the cake (I borrowed a gingerbread's smile, from "sweet christmas.") And guess what? Mask that too. Stamp the balloon next, (from "admit one") and mask that too. After every image is sporting a mask, stamp the "wishing happy birthday to you" sentiment (from "check this out") repeatedly, until the entire piece of cardstock is filled. Using a sponge, rub distress ink over the entire piece, to make the background more subtle. Remove the masks, and color in with copic markers. Add a little liquid-appliqué to the gnome's party hat pom-pom to seal the deal.
I hope you like it! Now your turn to get busy:
You could win a prize from our sponsor, Simon Says Stamp:
Confession time: I've watched "Gnomeo and Juliet" more times than I'd like to admit this holiday season. I found it on liquidation, and stuck it under the tree for the kids as an afterthought, and they have become obsessed. My 2 year old walks around the house, yelling out quotes from the movie. Oy.
So, it was only natural that I would stamp a birthday gnome for lawnscaping's big day (and then use some leftover cake-pops for the photo-staging, hee hee):
Here's the how-to: Start out by stamping the gnome, from "gnome sweet gnome" and add a little party pom-pom to the top of his hat (really, a puff of train smoke from "pa-rum-pa-pum-pum"). Next step is to mask the gnome and his pom-pom, and stamp the cake (from "bake me a cake"). Add a smiley face to the cake (I borrowed a gingerbread's smile, from "sweet christmas.") And guess what? Mask that too. Stamp the balloon next, (from "admit one") and mask that too. After every image is sporting a mask, stamp the "wishing happy birthday to you" sentiment (from "check this out") repeatedly, until the entire piece of cardstock is filled. Using a sponge, rub distress ink over the entire piece, to make the background more subtle. Remove the masks, and color in with copic markers. Add a little liquid-appliqué to the gnome's party hat pom-pom to seal the deal.
I hope you like it! Now your turn to get busy:
You could win a prize from our sponsor, Simon Says Stamp:
Thanks for stopping by!
Wednesday, January 2, 2013
Happy new year & a CSS app card
Happy new year, peeps!
Our celebrations were small, and at home. The hubs and I struggled to stay awake, and Maia was asking for her bed around 8pm, but Sofia and Thomas were on a sugar-high or something *rolls eyes* (maybe I did a little too much baking for the soirée...) Sofia called everyone she knew yesterday, to tell them that she made it "past midnight."
Do you choose a word for the year? My word for the year is simply TRY. Last year, we chose JOY. The year before, BREATHE (because some years, that's all you can do.) This year, we have so many resolutions and goals, and I don't want to feel like my word is anything more than just to try my best to reach them. Plus, Maia's been walking around the house singing the chorus to that Pink song: "you gotta get up and try, try, try." So, I'm gonna.
To kick off the new year, I have a card on the CSS app today:
Our celebrations were small, and at home. The hubs and I struggled to stay awake, and Maia was asking for her bed around 8pm, but Sofia and Thomas were on a sugar-high or something *rolls eyes* (maybe I did a little too much baking for the soirée...) Sofia called everyone she knew yesterday, to tell them that she made it "past midnight."
Do you choose a word for the year? My word for the year is simply TRY. Last year, we chose JOY. The year before, BREATHE (because some years, that's all you can do.) This year, we have so many resolutions and goals, and I don't want to feel like my word is anything more than just to try my best to reach them. Plus, Maia's been walking around the house singing the chorus to that Pink song: "you gotta get up and try, try, try." So, I'm gonna.
To kick off the new year, I have a card on the CSS app today:
Click on the image to be taken to the CSS app store. Download it, for fun CSS inspiration for every day of 2013!
Subscribe to:
Posts (Atom)
-AppSneak.jpg)

-AppSneak.jpg)